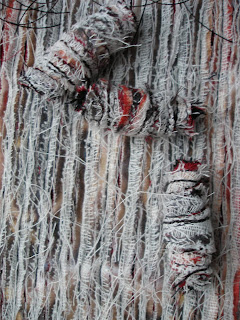
I wanted to use the slashing technique to create the cover. My first attempt was a bit of a disaster.
I made a‘sandwich’ consisting of a backing of calico, then red silk noil with 11 pieces of patterned cotton patchwork fabric followed by a top layer of plain black cotton.
I then machine stitched ¼” lines in 3 blocks of 7 rows. I slashed through all the layers as the idea was to then lay the piece on top of another red piece of fabric as a background. After rinsing it through and putting the piece in the tumble drier, this is what it came out like..
Not at all as I wanted it! On reflection I should not have slashed through all the layers but as I said I wanted to pull the ‘strands’ apart so that you could see the red background.
Anyway, I took lots of close up photographs – things always look so much better in close up – and decided to use this one.
I played around with it in PSP and printed it on to a piece of muslin using t-shirt transfer paper.
I then made another ‘sandwich’ of fabric with a calico backing, followed by a layer of black felt, two layers of red muslin, two layers of white muslin, the transfer printed muslin and one last layer of white muslin on the top.
Once again, I machine stitched in ¼” lines using a black rayon thread, then slashed through all layers of fabric except the black felt & calico.
I used black beads to secure the ends of the threads.

I had previously soaked a piece of white muslin in Bubble Jet Set and using a ‘typewriter’ font printed out the words ‘Black & White & a dash of red’. I cut these out and stitched them onto the slashed fabric.


I made some beads using a spare piece of the slashed fabric by cutting elongated triangle shapes and wrapping them around a bodkin before securing them in place on top of the cover.

This is the finished cover…
...and a (very) rough sketch of how I hope the cover will look when finished – although it will probably change many times before then!


9 comments:
I love your book cover!! The colours and textures are wonderful!! It's great how you've posted how it all came about....
Well it was quite a journey to get to the final result but it was worth it. The cover is wonderful!
Too cool! Thank you for sharing the details of the process. The final result was worth the early disappointment!
Thanks for sharing your experiences. I love how it looks. I would never have thought to use a transferred photo image along in the fabric layers. I also really like the beads on it.
thanks for documenting your process. It looks wonderful. Especially the 'loose' threads securing the beads, the 'scrap' beads and the font. All these 'little' things add so much to the background fabric (what a lot of layers! you've loads more patience than me!)
Wonderful to see the progression of the cover in detail, thanks for sharing
So Mum, this is what you do with the doodles you make while i bore you silly on the phone....most people just draw squares and circles!!
What a great post!
And a wonderful cover for your book!
I really like your cover and the technique you used to make it. Thanks for sharing the process.
Post a Comment